Pages

Showing posts with label April Rhodes. Show all posts

Friday, June 21, 2013

Staple dress outing

It's pretty close to mid winter here in Australia, and while we are not neck deep in snow or battling horizontal rain, it's still a little chilly here...by Perth standards anyway ;)
Thanks to our Mediterranean type clime sunny day winter dressing often means adding tights, singlet and jacket to what normally would be spring/early summer dressing.
So I got to wear my newly finished Staple dress out to some local shops and then a park by the river where we let the kids run off steam. While midday sun is not ideal for photography, I was able to coerce persuade hubby to take some pics of The Dress, so you can see what it's like being worn:

Kids fascinated with river!
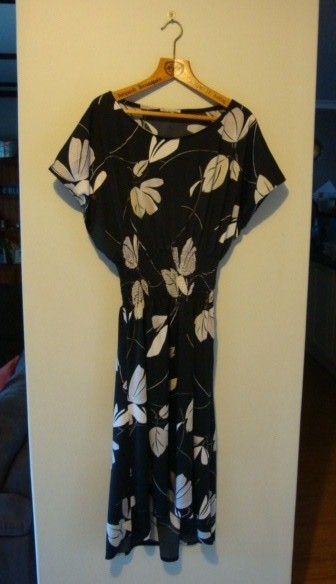
Not a lot of the dress can be seen in the pic above, but it does give you an idea of the high-low hem- one of my favourite features. 
This is what the hemline looks like close up on a hanger:


And a couple more pics, in and out of sun:


Fishnets and boots! Not 100% sure if this is the best look but it worked on the day!

Can't wait to make another one of these dresses up :D

Happy Sewing :)

Kate x

Shirring Fun 101


Making my Staple Dress recently I finally had reason to bite the bullet and try out sewing with shirring elastic in my sewing machine bobbin.


 Don't ask me why I've put off doing it until now, why this has seemed like such a scary sewing thing to do with my machine. 
Prior to the Staple dress I've been using the much more time consuming technique of narrow elastic and a small zig zag stitch for anything that required a "shirred" effect (like in this strapless dress I made way back in 2009), painstakingly marking stitch lines with chalk and pinning the elastic to the lines at regular intervals. 
Amazing what having a lot less free sewing time can do (hello motherhood!). 
The information April Rhodes gives for shirring in her pattern instructions are excellent.  If for some reason the first method for shirring doesn't work with your machine she offers up alternative techniques/method to use.
Luckily my Janome seemed pretty happy with the first variation of shirring given, that is sewing with shirring elastic wound loosely (by hand )onto your machine bobbin:

Hand wound shirring elastic on bobbin
Even though its hard to tell this is reasonably loosely wound- the aim is not to stretch the elastic as you wind it on, otherwise it will end up overstretched when sewing and your resulting shirred fabric wont have much stretch.

Threaded up and ready to shirr!

As this was my first time machine shirring it took a bit of getting used to the feel of sewing with the elastic. I'm not 100% sure if it should feel this way but sometimes it really felt like the machine was fighting against the elastic in the bobbin.


Also I managed to accidently wind on some very old- and deteriorated- shirring elastic that I had lying around by mistake. I figured what had happened after I had tried on the dress for fit and the two lines of shirring sewn with old elastic "popped" instead of stretching! I chucked out the yucky old elastic and resewed over the popped lines, but they just didn't end up as neat as the others that were sewn with new elastic. 
Lesson learnt :( 
"Popped" stitches in the middle

Resewn rows from back (extra elastic visable)

Also maybe it was the slight bulk of the fabric but sewing over the side seams also created a few abnormalites in the shirring:

Widely spaced shirring over side seam bulk

I'm wondering if maybe next time I would be better off sewing the shirring lines accross the front and back before sewing up the side seams to avoid this. Only thing would be making sure that the shirr lines matched at each side, which might require careful marking *sigh*.
Once the dress is on the rest of the shirring stretches out and the side seam spacing is much less noticable, so my other option may just be to learn to live with it.... especially if next time I make it with a less bulky fabric.

 Finally you can tell I'm no shirring expert as the inside of my dress looks a tad messy:
But it has survived three washes so far and is still behaving like shirring should, so I can't be too unhappy with my first attempt ;)

The elastic that I used time was just some generic sewing elastic I picked up at Spotlight on a whim. Since buying it I have read up online and apparently some elastics shirr better than others. One brand in particular I've heard good thing about is Stretchrite. I'm hoping that I might find it in stock at a local sewing shop here once the generic stuff runs out, but if not it it seems to be plentifully avaiable on the internet- one way or another I'll get my hands on some! 

Til next time...

Happy Sewing (and may all your shirring be evenly spaced)!

;)

Kate x


Wednesday, June 19, 2013

Staple dress is DONE!

So I finally got around to hemming my Staple dress (April Rhodes patterns) that I started on Sewing Weekend Away:

 There was much swearing and several glasses of wine as my machine seemed hell bent on sucking much of the fabric into the feed plate, but after a good nights sleep - and some reflection- we all got there.... more or less with sanity intact ;)
 I must admit after first assembling this dress - before the shirring - I did think OMG what a SACK! But row by row (16 rows in all) I finally cinched it in enough so that the dress now has some "shape" and shows of what little (post-kids) waist I still have.
Side view showing corset like shirring panel around waist. And yeah I'm thinking that the bra I'm wearing makes my chest look a bit weird too...Also is that a sway back alteration I'm needing???  

I managed to find a belt in my wardrobe that , while not the perfect colour, is a pretty good shape for this style of dress (at least on me). I think future dresses may be planned to tie in with this belt.... 

With belt.
Without belt.
All up I'm pretty happy with this dress pattern. The shirring was a new thing for me to try out but not as scary as I thought it would be. 
The high-low hem is a nice deviation from what I normally make/wear and surprisingly even though the neckline is not low cut I still don't feel like my boobs are the main feature when wearing this! 

The fabric used to make this dress is a vintage John Kaldor fabric that I picked up in a op-shop for a few dollars. I had no idea at the time of buying that John was such a big textile designer both in the Uk and Australia, maybe if I'd know I might have been a bit more careful with the cutting! Who am I kidding? I would have probably NEVER had cut into this had I know, so maybe its just as well...
As far as the fabric goes: make-up is pretty much 210% synthetic (the wrong side sparkles!) plus it has a slight stretch to it, two factors which I think when combined together helped make this murder to hem. The drape however is lovely and the textile design fairly timeless (I've already had a pretty "trendy" friend compliment me on the design). I figured the un-natural fibres would work OK in my wardrobe as long as I didn't the dress in the heat of summer or try to iron it...or near an open flame.
I added my usual 10-15 cm to length and unfortunately did not think about pocket placement post lengthening enough to make them practicable. My pocket got hacked out as they ended up being in the knee region, not a good look on anyone I think!

This dress has already had a short outing in public, while in mummy capacity, and fared well (dare I say) for something I slapped together made myself;)
More pics to follow.

'Til then...

Happy Sewing!

Kate x

Tuesday, May 14, 2013

Sewing weekend countdown!

Only three more sleeps until the next Burdastyle Sewing Club Perth weekend away - I can't wait!!!
In July last year I went to the first ever sewing weekend away for the club, two days of sewing, eating and hanging out with like minded people: it.was.AWESOME! Unfortunately I missed the second weekend away due to DS coming down with a bout of tonsillitis (Yep mum was needed big time that week), but so far its looking good for this time around *fingers crossed*.

Last time we were in Dwellingup, but just to keep thing interesting we are going to Moondyne Convention Centre for this meet - how serene and awe inspiring does all that countryside look? Perfect place to attempt something creative I think :)

Sooo of course with hardly any time left to pack (I have two small people to look after tomorrow and my "other" day job the next two days after) I am TOTALLY unorganised and unprepared. Seeing as am taking DH's hard-top ute (he gets the mummymobile for the weekend hehehe)  I'm thinking pretty much that I will just chuck whatever in at the last minute, when packing after the kids are in bed- sounds like a plan eh??
I DO know that I will be taking my already-cut-out-and-waiting-to-go April Rhodes Staple Dress. I have heard GREAT things about this pattern on the blogosphere and I'm dying to try it out, this weekend it WILL happen!
No doubt I will have some blurry iPhone pics (and maybe some slightly better proper camera pics) to share with you after the weekend :D....and maybe some finished items too, so stayed tuned!

If you live in Perth (Western Australia) and are interested in fashion/garment sewing check out the Burdastyle Sewing Club Perth, they are a totally nice bunch of sewing people and weekends away like this are truly something special!!

I must say a huge " thank you" to dear hubby who - even though yes technically it IS his job as dad- is looking after the twinlets while I have my weekend away.
Thanks hun,couldn't do it without you! xxx

If I don't catch you before my big sleepover...

Happy sewing!

Kate :)